שלום לכולם,
במאמר הזה אני רוצה לדבר אתכם על פתרון Point-To-Site מה זה בכלל Point-To-Site ואיך מגדירים את הפתרון ב-Azure?
מה זה Point-To-Site?
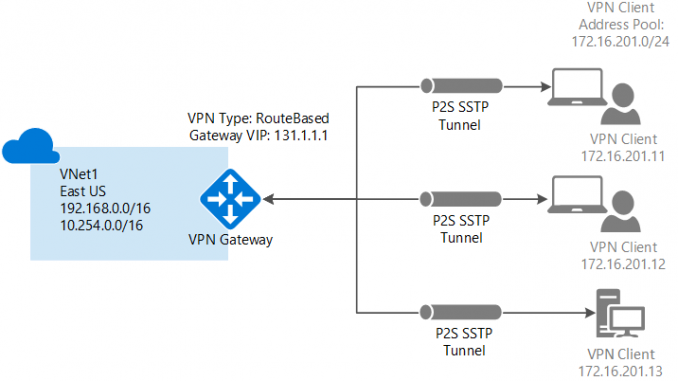
פתרון Point-To-Site מאפשר לנו ליצור חיבור מאובטח לרשת שלנו (במקרה שלנו הרשת ב-Azure) ממחשב קצה באופן פרטני בלי תלות במיקום המחשב.
חיבור Point-To-Site אינו מצריך ציוד VPN מתקדם ומאפשר לנו גישה לרשת ברגע שהמשתמש מפעיל את התחברות (VPN Client) במחשב הקצה שלו באופן מאובטח בעזרת פרוטוקול (Secure Socket Tunnelling Protocol (SSTP עם הזדהות בעזרת תעודות.
Point-To-Site הוא פתרון מצוין כאשר רוצים להתחבר ל-VNET ממיקום מרוחק כמו מהבית, בית קפה או אפילו שיש לך מספר ספקים או לקוחות שצריכים להתחבר לסביבה שלך באופן מאובטח ללא צורך להשתמש בהתקני חומרה יקרים.
נכון לכתיבת מאמר זה אין אפשרות להגדיר (Point-To-Site(ARM בעזרת פורטל Azure.
אז בואו נתחיל בהקמת הפתרון על גבי Azure ב-4 שלבים + שלב בדיקות ![]()
שלב ראשון – הגדרת ה-Virtual Network (תשתיות הרשת) ב-Azure.
ניתן להקים את ה-VNET במספר דרכים כמו Azure Portal, PowerShell ועוד.
אני בחרתי להראות לכם איך מקימים VNET בעזרת PowerShell:
#Resource Group Name
$RGName = "DemoRG01"
#Azure Region
$Location = "West Europe"
#Azure VNET Name
$VNetName = "DemoVNet01"
#VNet Address Space
$VNetAddress = "192.168.0.0/16"
#First Subnet Name
$SubnetName01 = "LAN"
#First Subnet Range
$SubnetRange01 = "192.168.1.0/24"
#Gateway Subnet Name – 'GatewaySubnet' is mandatory for the gateway to work (please do not change this name)
$SubnetGWName = "GatewaySubnet"
#Gateway Subnet Range
$SubnetGWRange = "192.168.10.0/28"

#Create ResourceGroup
New-AzureRmResourceGroup -Name:$RGName -Location:$Location;

#Create VNET
$Subnet01 = New-AzureRmVirtualNetworkSubnetConfig -Name $SubnetName01 -AddressPrefix $SubnetRange01;
$SubnetGW = New-AzureRmVirtualNetworkSubnetConfig -Name $SubnetGWName -AddressPrefix $SubnetGWRange;
New-AzureRmVirtualNetwork -Name:$VNetName -AddressPrefix:$VNetAddress -Subnet $Subnet01, $SubnetGW -ResourceGroupName:$RGName -Location:$Location;
שלב שני – יצירת Root Certificate ו-Client Certificate
כדי לאפשר חיבור VPN בין תחנת הקצה ל-Azure VNET יש צורך בשימוש בתעודות על מנת לבצע את ההזדהות.
בשלב זה אנחנו מעלים את ה-Root Certificate שלנו ולאחר מכן נצטרך להנפיק תעודות לתחנות הקצה על מנת לבצע התחברות תקינה.
ניתן להשתמש באחד משני סוגי Root Certificate הבאים:
- שימוש ב-Root מסביבת Enterprise Certificate שיש לנו בארגון.
- שימוש ב-Root Self-Signed.
- יש ליצור Root Self-Signed Certificate בעזרת הפקודה הבאה:
makecert -sky exchange -r -n "CN=RootCertDemo" -pe -a sha1 -len 2048 -ss My "RootCertDemo.cer"ולאחר מכן יש לייצא את התעודה בלי ה-Private Key ולשמור בפורמט Base-64 encoded X.509.
- יש לפתוח את ה-Root Certficate שייצאנו ב-Notepad ולהעתיק את הקטע בין “BEGIN CERTIFICATE & END CERTIFICATE“ ולהכניס למשתנה RootCertKey$ שמופיע בשלב 3.
- יצירת Azure VPN Root Certficate (העלאת התעודה ל-Azure):
#Root Cert Name
$RootCertName = "RootCertDemo.cer";
#Key of Root Self-Sigend Certficate Base64 format
$RootCertKey = "MIIC/DCCAeigAwIBAgIQqrRzKBnAzrtHQtZukHFoMTAJBgUrDgMCHQUAMBcb3RDZ......";

#Create Azure VPN Root Cert "Upload the Root Cert"
$AZRRootCert = New-AzureRmVpnClientRootCertificate -Name:$RootCertName -PublicCertData:$RootCertKey;
- הנפקת Client Certificate בעזרת הפקודה הבאה:
שלב שלישי – יצירת Azure Gateway עם Point-To-Site
לאחר שהגדרנו את הרשת והעלנו את ה-Root Certficate לענן כל מה שנשאר לנו הוא להגדיר את ה-Azure Gateway עם טווח הכתובות עבור משתמשי הקצה שמתחברים בעזרת Point-To-Site
#Get VNET Configuration
$VNet = Get-AzureRmVirtualNetwork -Name:$VNetName -ResourceGroupName:$RGName;
#Get Gateway Subnet VNET Configuration
$SubnetGateway = Get-AzureRmVirtualNetworkSubnetConfig -Name "GatewaySubnet" -VirtualNetwork:$VNET;
#Gateway Name
$GatewayName = "GatewayDemo"
#Gateway PublicIP Name
$GatewayPIPName = "GatewayDemoPIP"
#VPN Client Pool Range (Point-To-Site Pool)
$VPNClientPool = "172.16.1.0/24"
#Create Public IP
$PublicIP = New-AzureRmPublicIpAddress -Name $GatewayPIPName -AllocationMethod:"Dynamic" -ResourceGroupName:$RGName -Location:$Location;
#Create Gateway Configuration
$GatewayConf = New-AzureRmVirtualNetworkGatewayIpConfig -Name:"GWConf" -Subnet:$SubnetGateway -PublicIpAddress:$PublicIP;

#Create Gateway using Gateway Configuration and Point-To-Site Configuration
New-AzureRmVirtualNetworkGateway -Name:$GatewayName -IpConfigurations:$GatewayConf -GatewayType:Vpn -VpnType:RouteBased -EnableBgp:$false -GatewaySku:Standard -VpnClientAddressPool:$VPNClientPool -VpnClientRootCertificates:$AZRRootCert -ResourceGroupName:$RGName -Location:$Location;
שלב יצירת Azure Gateway לוקח בדר”כ כ-30 דקות.
שלב רביעי – התקנת VPN Client ו-Client Certificate.
התקנת Client Certificate
בשלבים הקודמים יצרנו Client Certificate ושמרנו את ה-PFX בצד, כעת אנו צריכים להשתמש ב-PFX ולהתקין את התעודה על התחנה הרצויה.
כל מה שצריך לעשות לעשות זה Install לתעודה ולהזין את הסיסמה שאיתה ביצענו את ה-Export.
לאחר שהתקנו את התעודה בהצלחה נתקין את ה-VPN Client ונתחבר לסביבה.
התקנת VPN Client
לאחר שהתקנו את התעודה נוריד את ה-VPN Client בעזרת הפקודה הבאה:
#Get Azure VPN Client Package URL
Get-AzureRmVpnClientPackage -VirtualNetworkGatewayName:$GatewayName -ProcessorArchitecture:"Amd64" -ResourceGroupName:$RGName;
נקבל לינק להורדת הקובץ ולאחר ההתקנה כל מה שנשאר הוא לבצע Connect ולהתחבר לסביבה.
שלב חמישי – ביצוע בדיקות התחברות
לאחר שביצענו Connect נוכל לוודא שהחיבור VPN פעיל בעזרת פקודת IPConfig /All.
בתוצאה נוכל לראות שקיבלנו כתובת IP מרשימת (Pool) הכתובות שהגדרנו עבור Point-To-Site.
לסיכום:
לינק להורדת הסקריפט שכולל יצירת VNET ו-Point-To-Site Gateway:
Create Azure VNET With Point-To-Site
לינק להורדת הסקריפט שכולל יצירת Point-To-Site Gateway מ-VNET קיים:
Create Point-To-Site on existing Azure VNET
בהצלחה חברים ![]()


Leave a Reply